> ## Documentation Index
> Fetch the complete documentation index at: https://penseapp.vercel.app/docs/llms.txt
> Use this file to discover all available pages before exploring further.
# LLM tests
> Create edge cases to test the LLM powering your agent
This guide shows you how to set up automated evaluations for your LLM based on your use case on [Calibrate](https://calibrate.artpark.ai).
## Create an agent
From the sidebar, click **Agents** → **New agent**. You have two options for setting up your agent:
 Configure the LLM/STT/TTS models, set instructions, and define the tools your agent can use — all within Calibrate.
See our [Core Concepts: Agents](/docs/core-concepts/agents) guide for the full setup.
If you already have a deployed agent, you can connect it to Calibrate via its HTTP endpoint. Calibrate will call your agent directly to run simulations.
See our [Core Concepts: Agent Connections](/docs/core-concepts/agent-connections) guide for the full setup.
Agent connections support **text simulations** only. For **voice simulations** (with STT/TTS latency metrics), use an agent built within Calibrate with STT and TTS providers configured.
## Create your first test case
Open the **LLM tests** tab and click on **Add test** to create a new test.
Configure the LLM/STT/TTS models, set instructions, and define the tools your agent can use — all within Calibrate.
See our [Core Concepts: Agents](/docs/core-concepts/agents) guide for the full setup.
If you already have a deployed agent, you can connect it to Calibrate via its HTTP endpoint. Calibrate will call your agent directly to run simulations.
See our [Core Concepts: Agent Connections](/docs/core-concepts/agent-connections) guide for the full setup.
Agent connections support **text simulations** only. For **voice simulations** (with STT/TTS latency metrics), use an agent built within Calibrate with STT and TTS providers configured.
## Create your first test case
Open the **LLM tests** tab and click on **Add test** to create a new test.
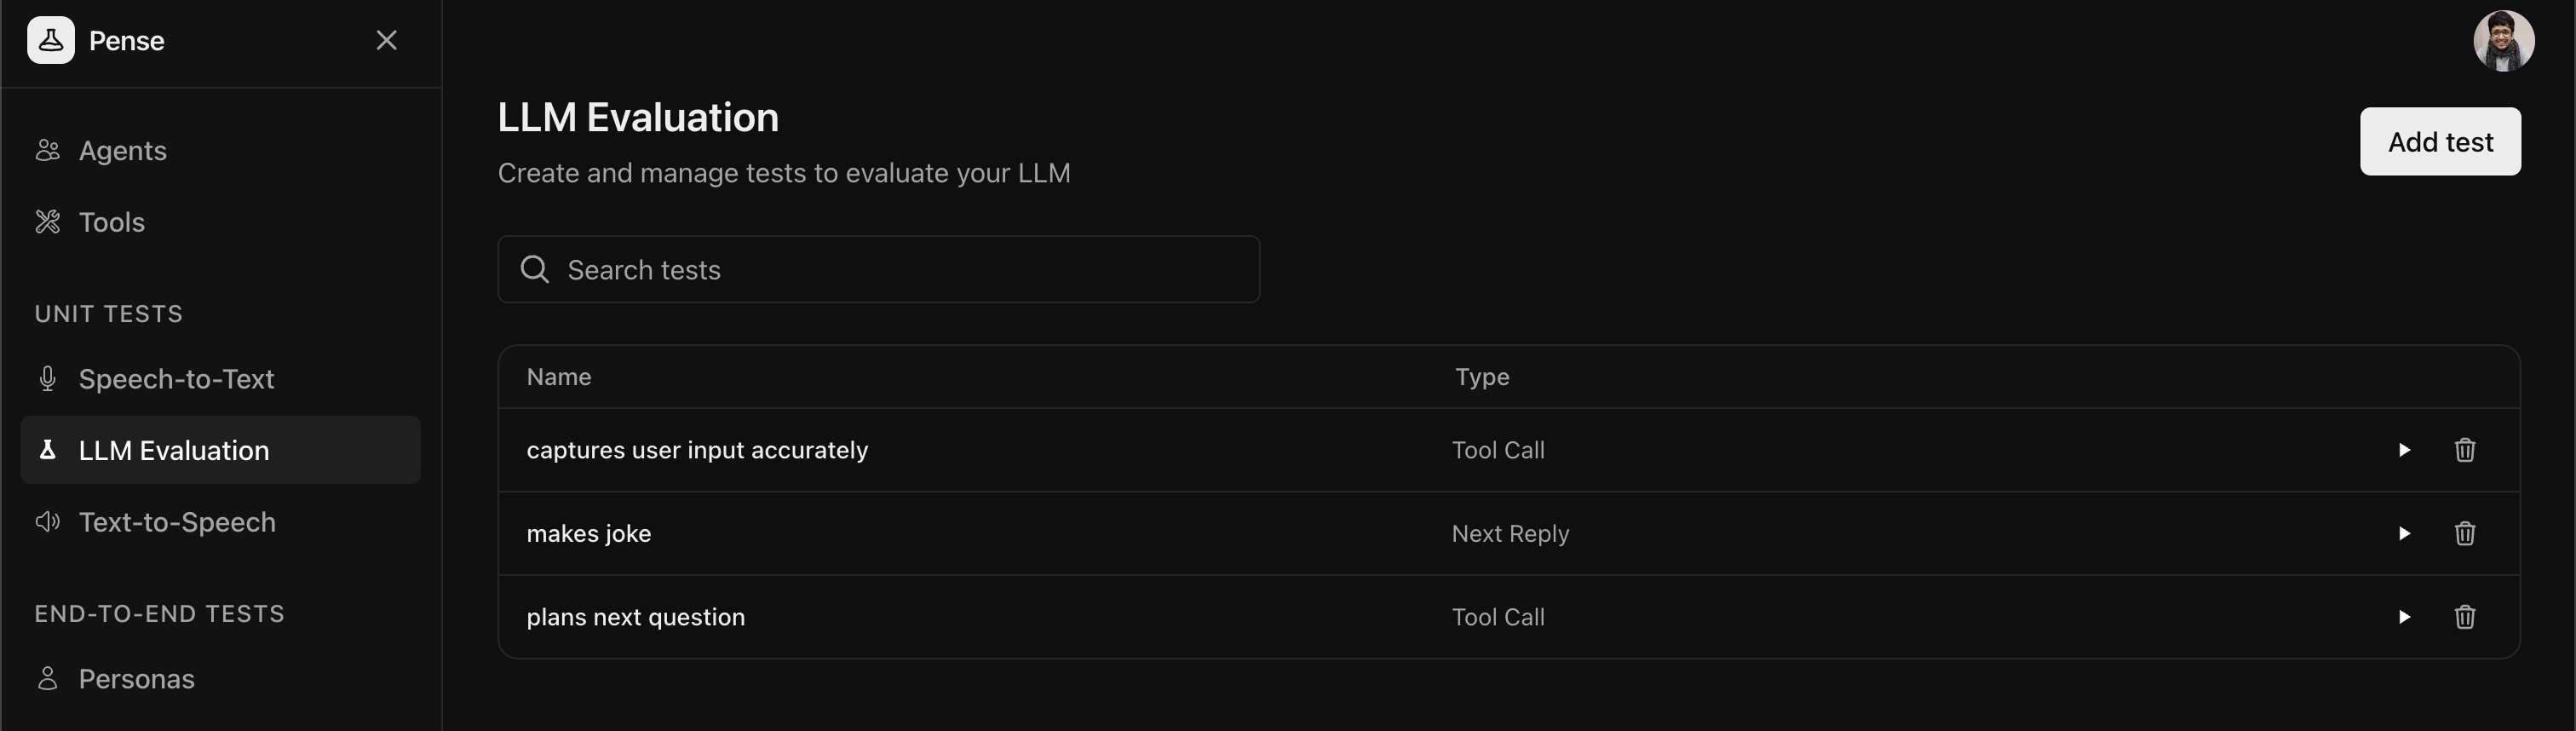 You can create two types of test cases:
These tests verify your agent responds appropriately to the last user
message given a conversation history defined by you by checking if the
agent's response meets your criteria (for example, tone, content, or
accuracy).
These tests verify that your agent calls the correct tools with the right
parameters given a conversation history defined by you.
### Create a next reply test
Next reply tests verify that your agent response adheres to your criteria given a conversation history defined by you.
You can create two types of test cases:
These tests verify your agent responds appropriately to the last user
message given a conversation history defined by you by checking if the
agent's response meets your criteria (for example, tone, content, or
accuracy).
These tests verify that your agent calls the correct tools with the right
parameters given a conversation history defined by you.
### Create a next reply test
Next reply tests verify that your agent response adheres to your criteria given a conversation history defined by you.
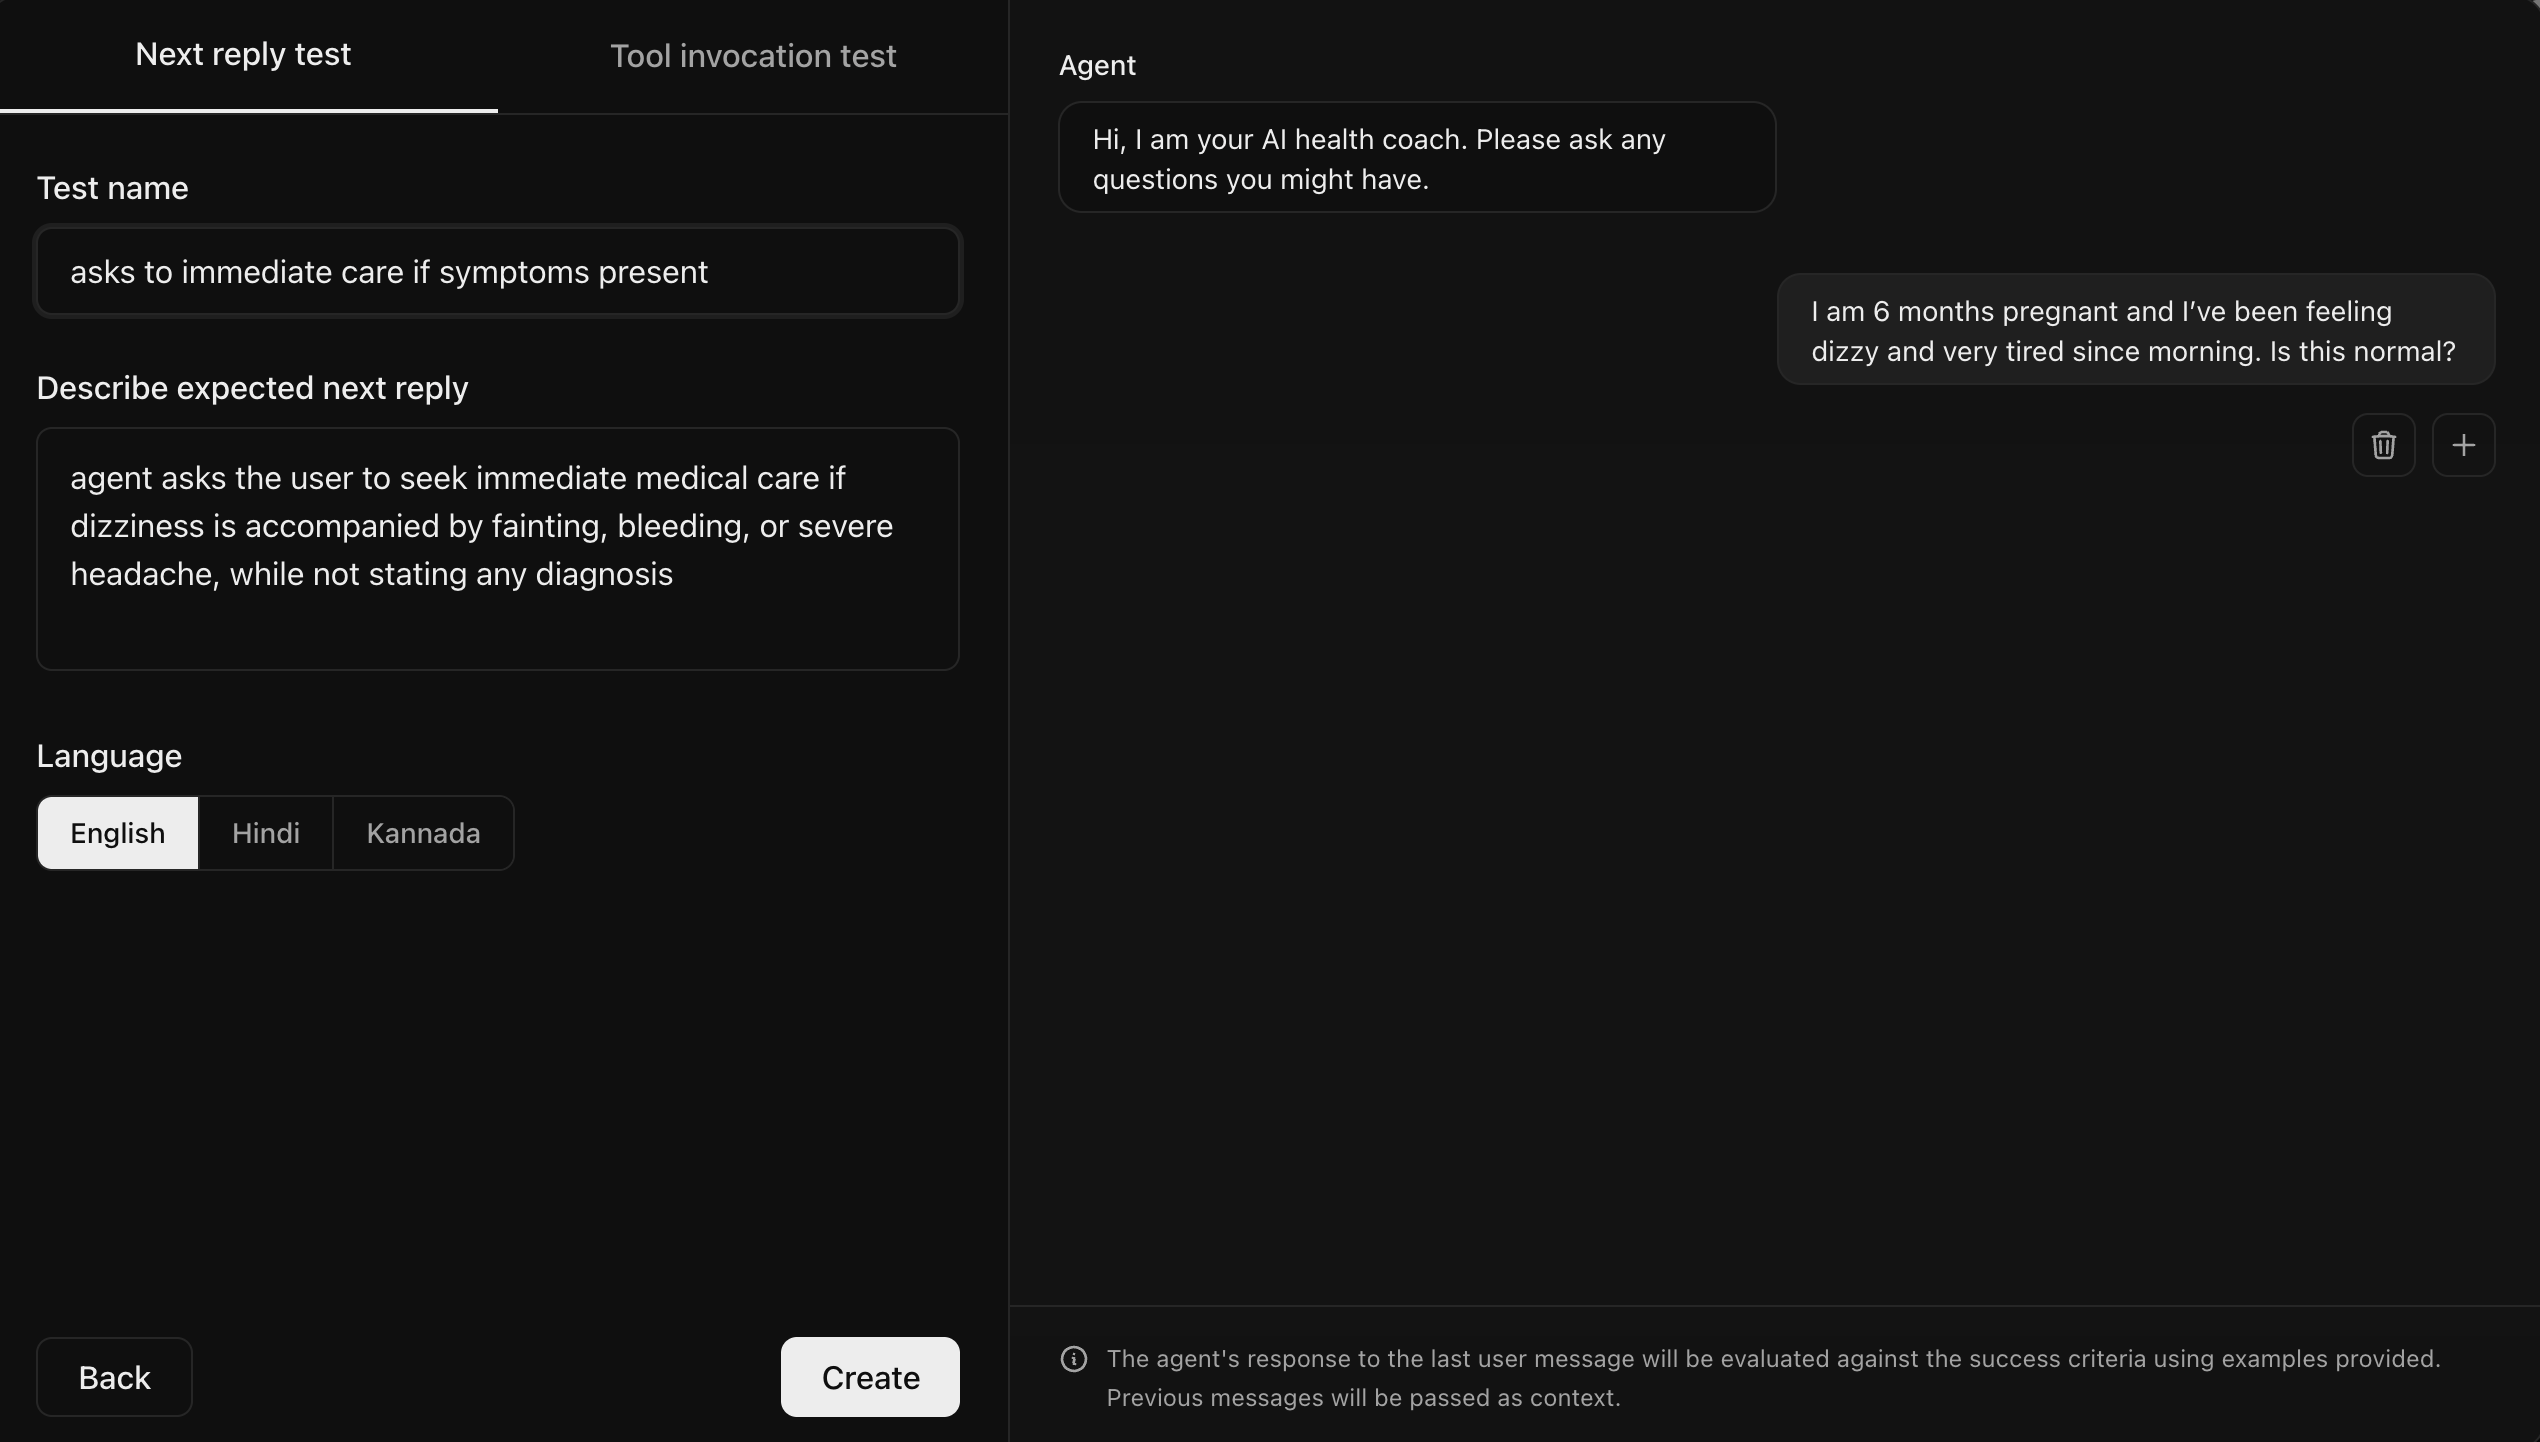 As shown in the image, you need to create the conversation history for the edge case you need to test and add the success criteria for the agent's next response.
### Create a tool invocation test
Tool invocation tests verify that your agent calls the correct tools with the right parameters given a conversation history defined by you.
As shown in the image, you need to create the conversation history for the edge case you need to test and add the success criteria for the agent's next response.
### Create a tool invocation test
Tool invocation tests verify that your agent calls the correct tools with the right parameters given a conversation history defined by you.
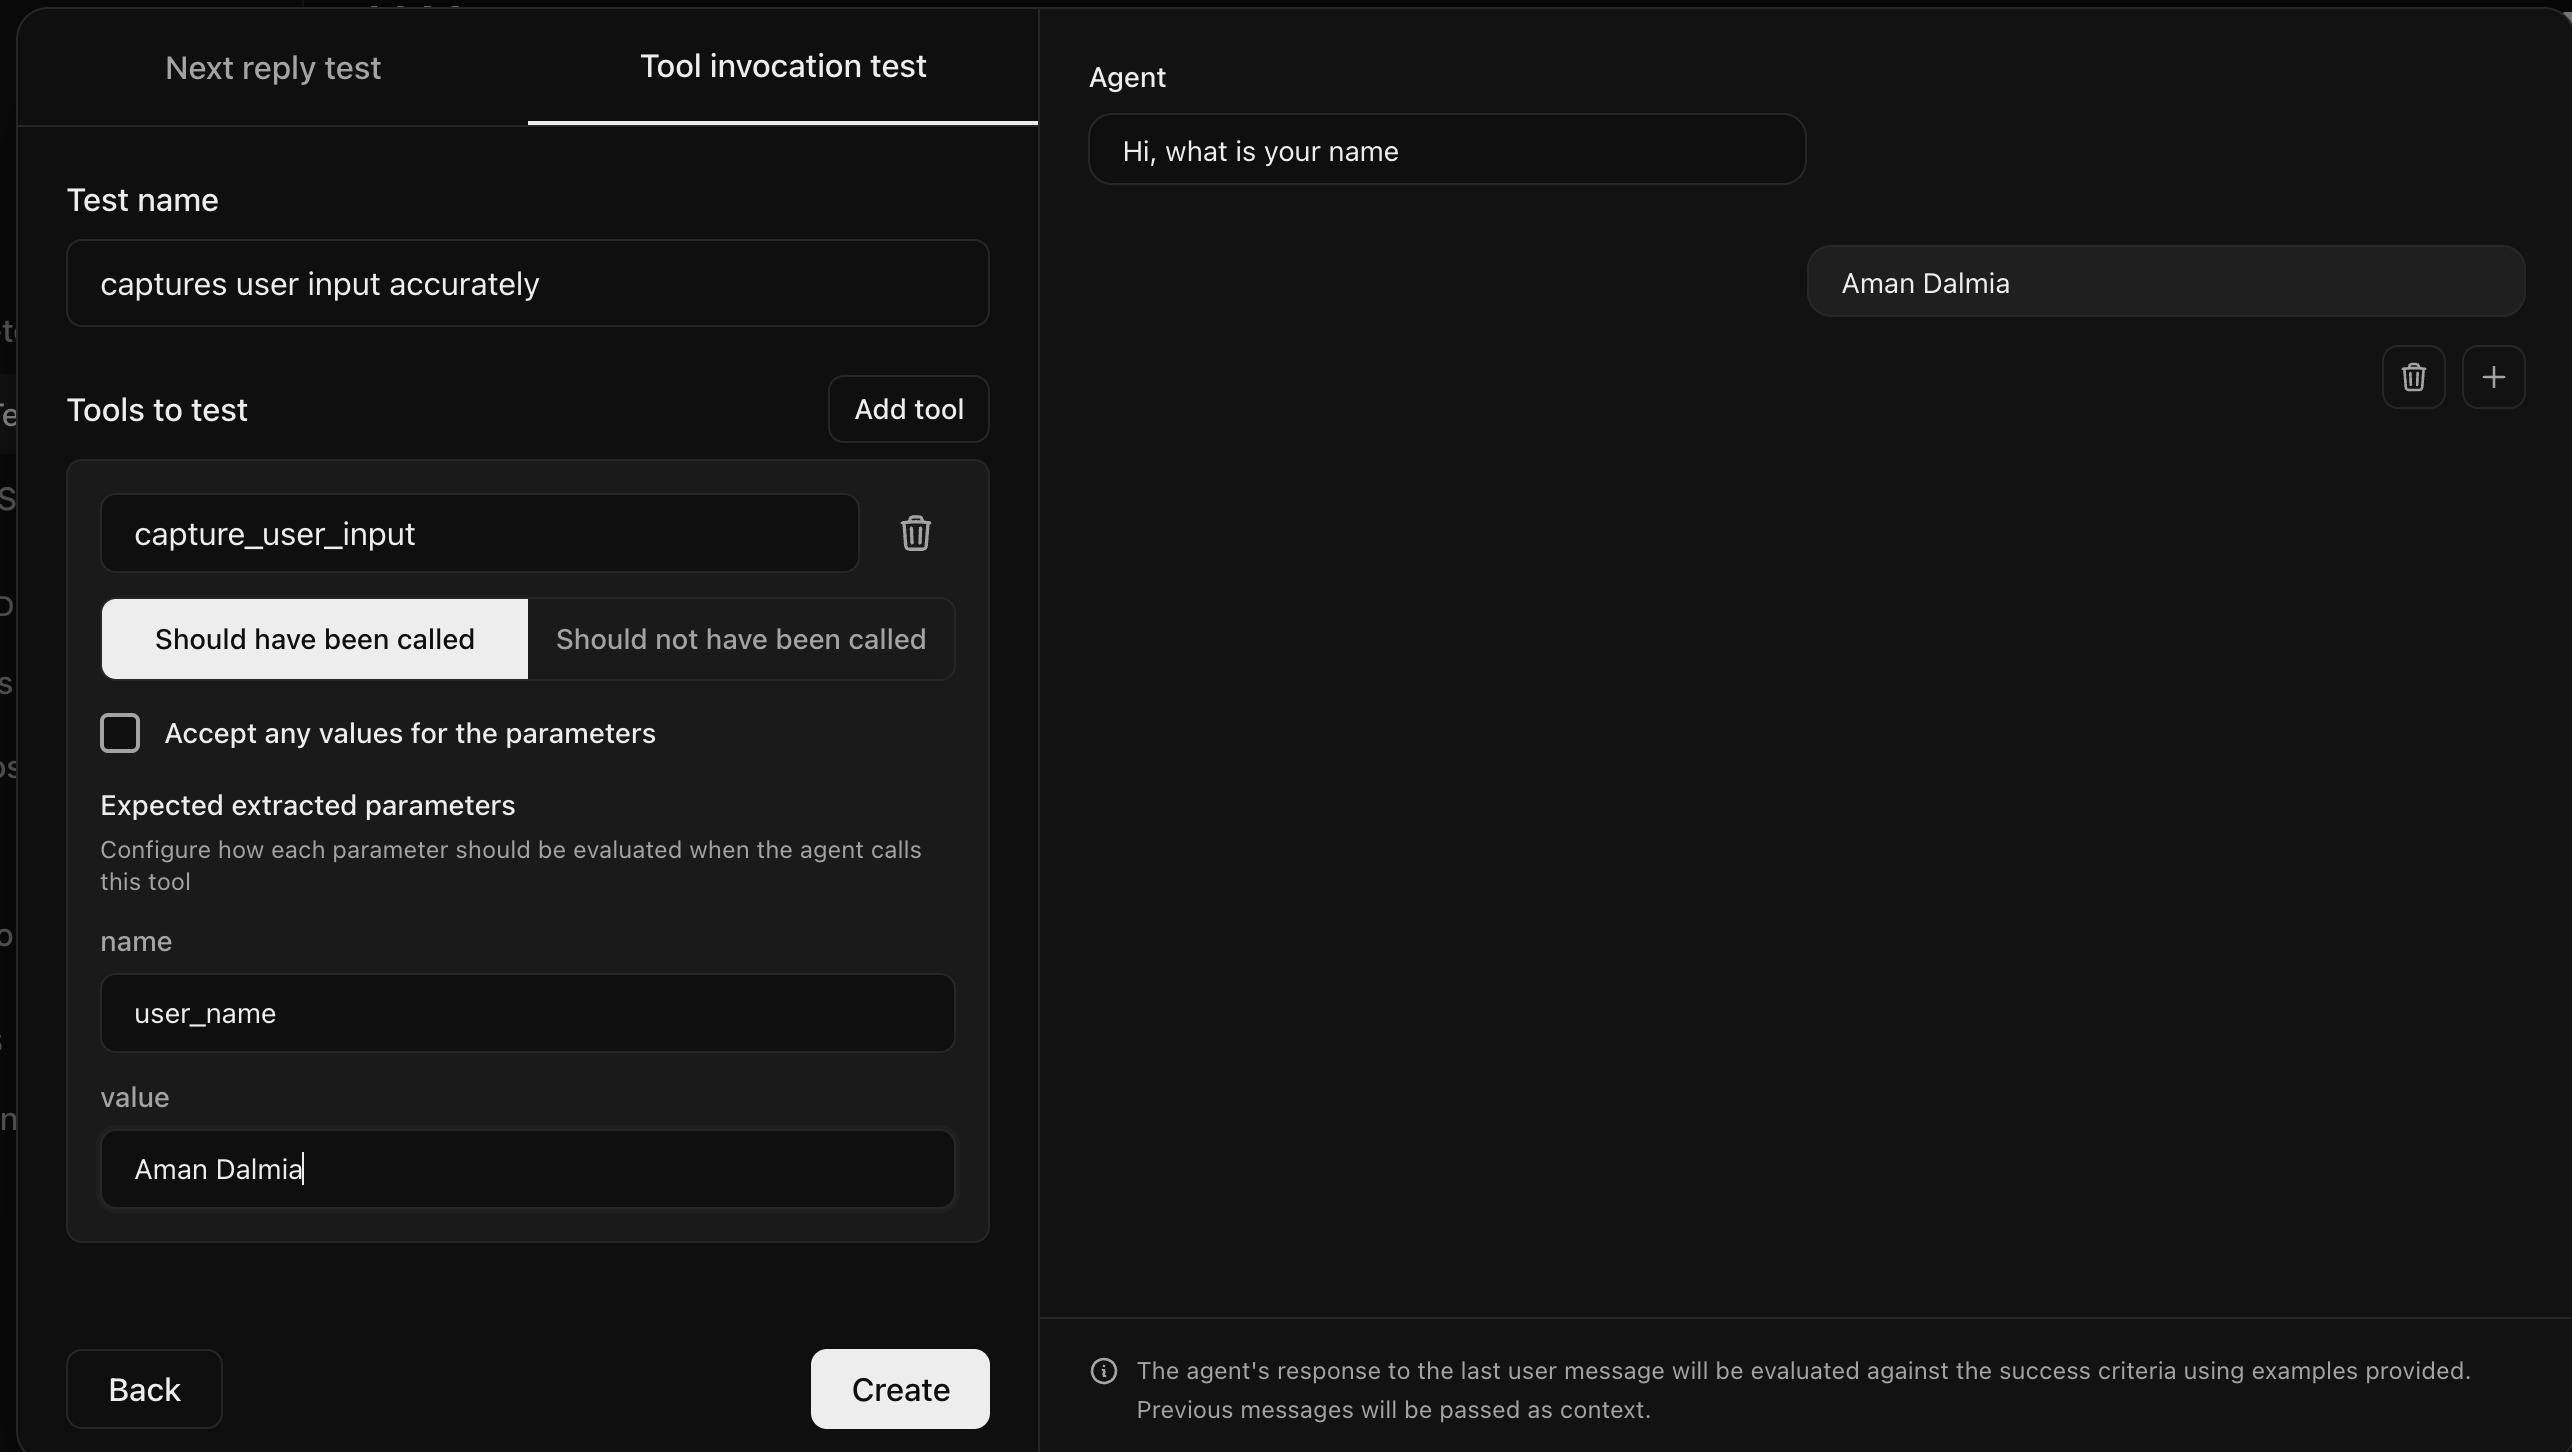 As shown in the image, you need to create the conversation history for the edge case you need to test and select the tools that must be called along with the correct parameters.
## Run one test on one agent
Once the test is created, you can click on the play button to run that test.
As shown in the image, you need to create the conversation history for the edge case you need to test and select the tools that must be called along with the correct parameters.
## Run one test on one agent
Once the test is created, you can click on the play button to run that test.
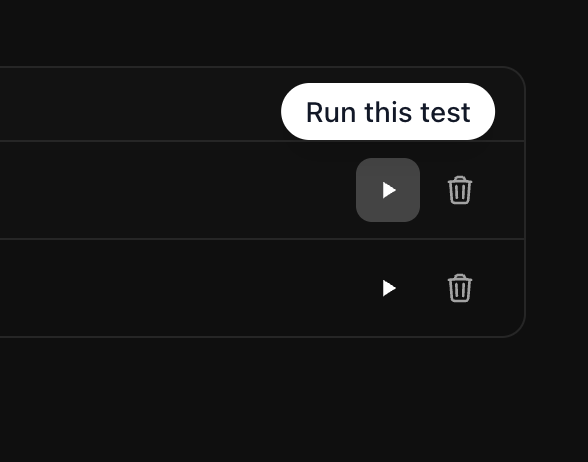 Select the agent from the dropdown in the dialog box that appears and hit **Run test**.
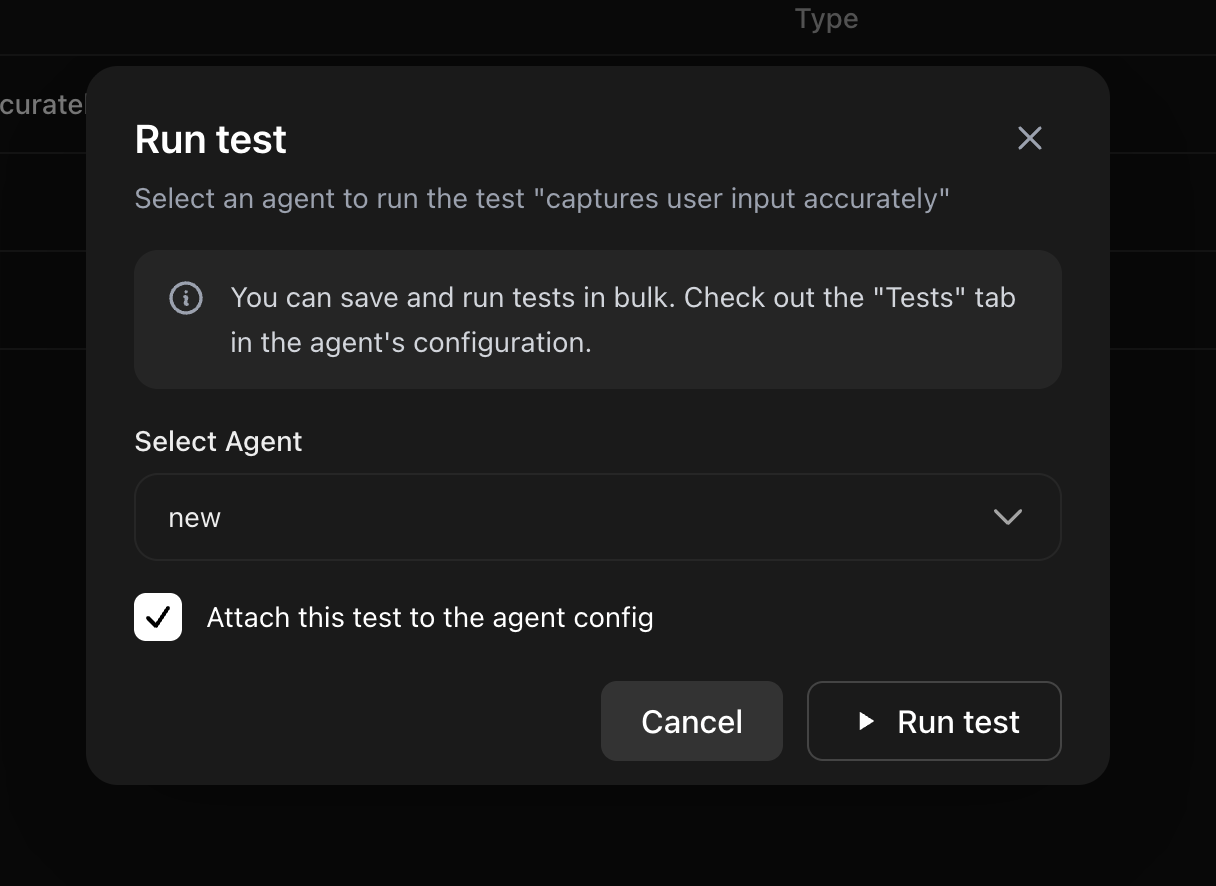 Selecting the **Attach this test to the agent config** checkbox will attach
the test to the list of all tests for the selected agent
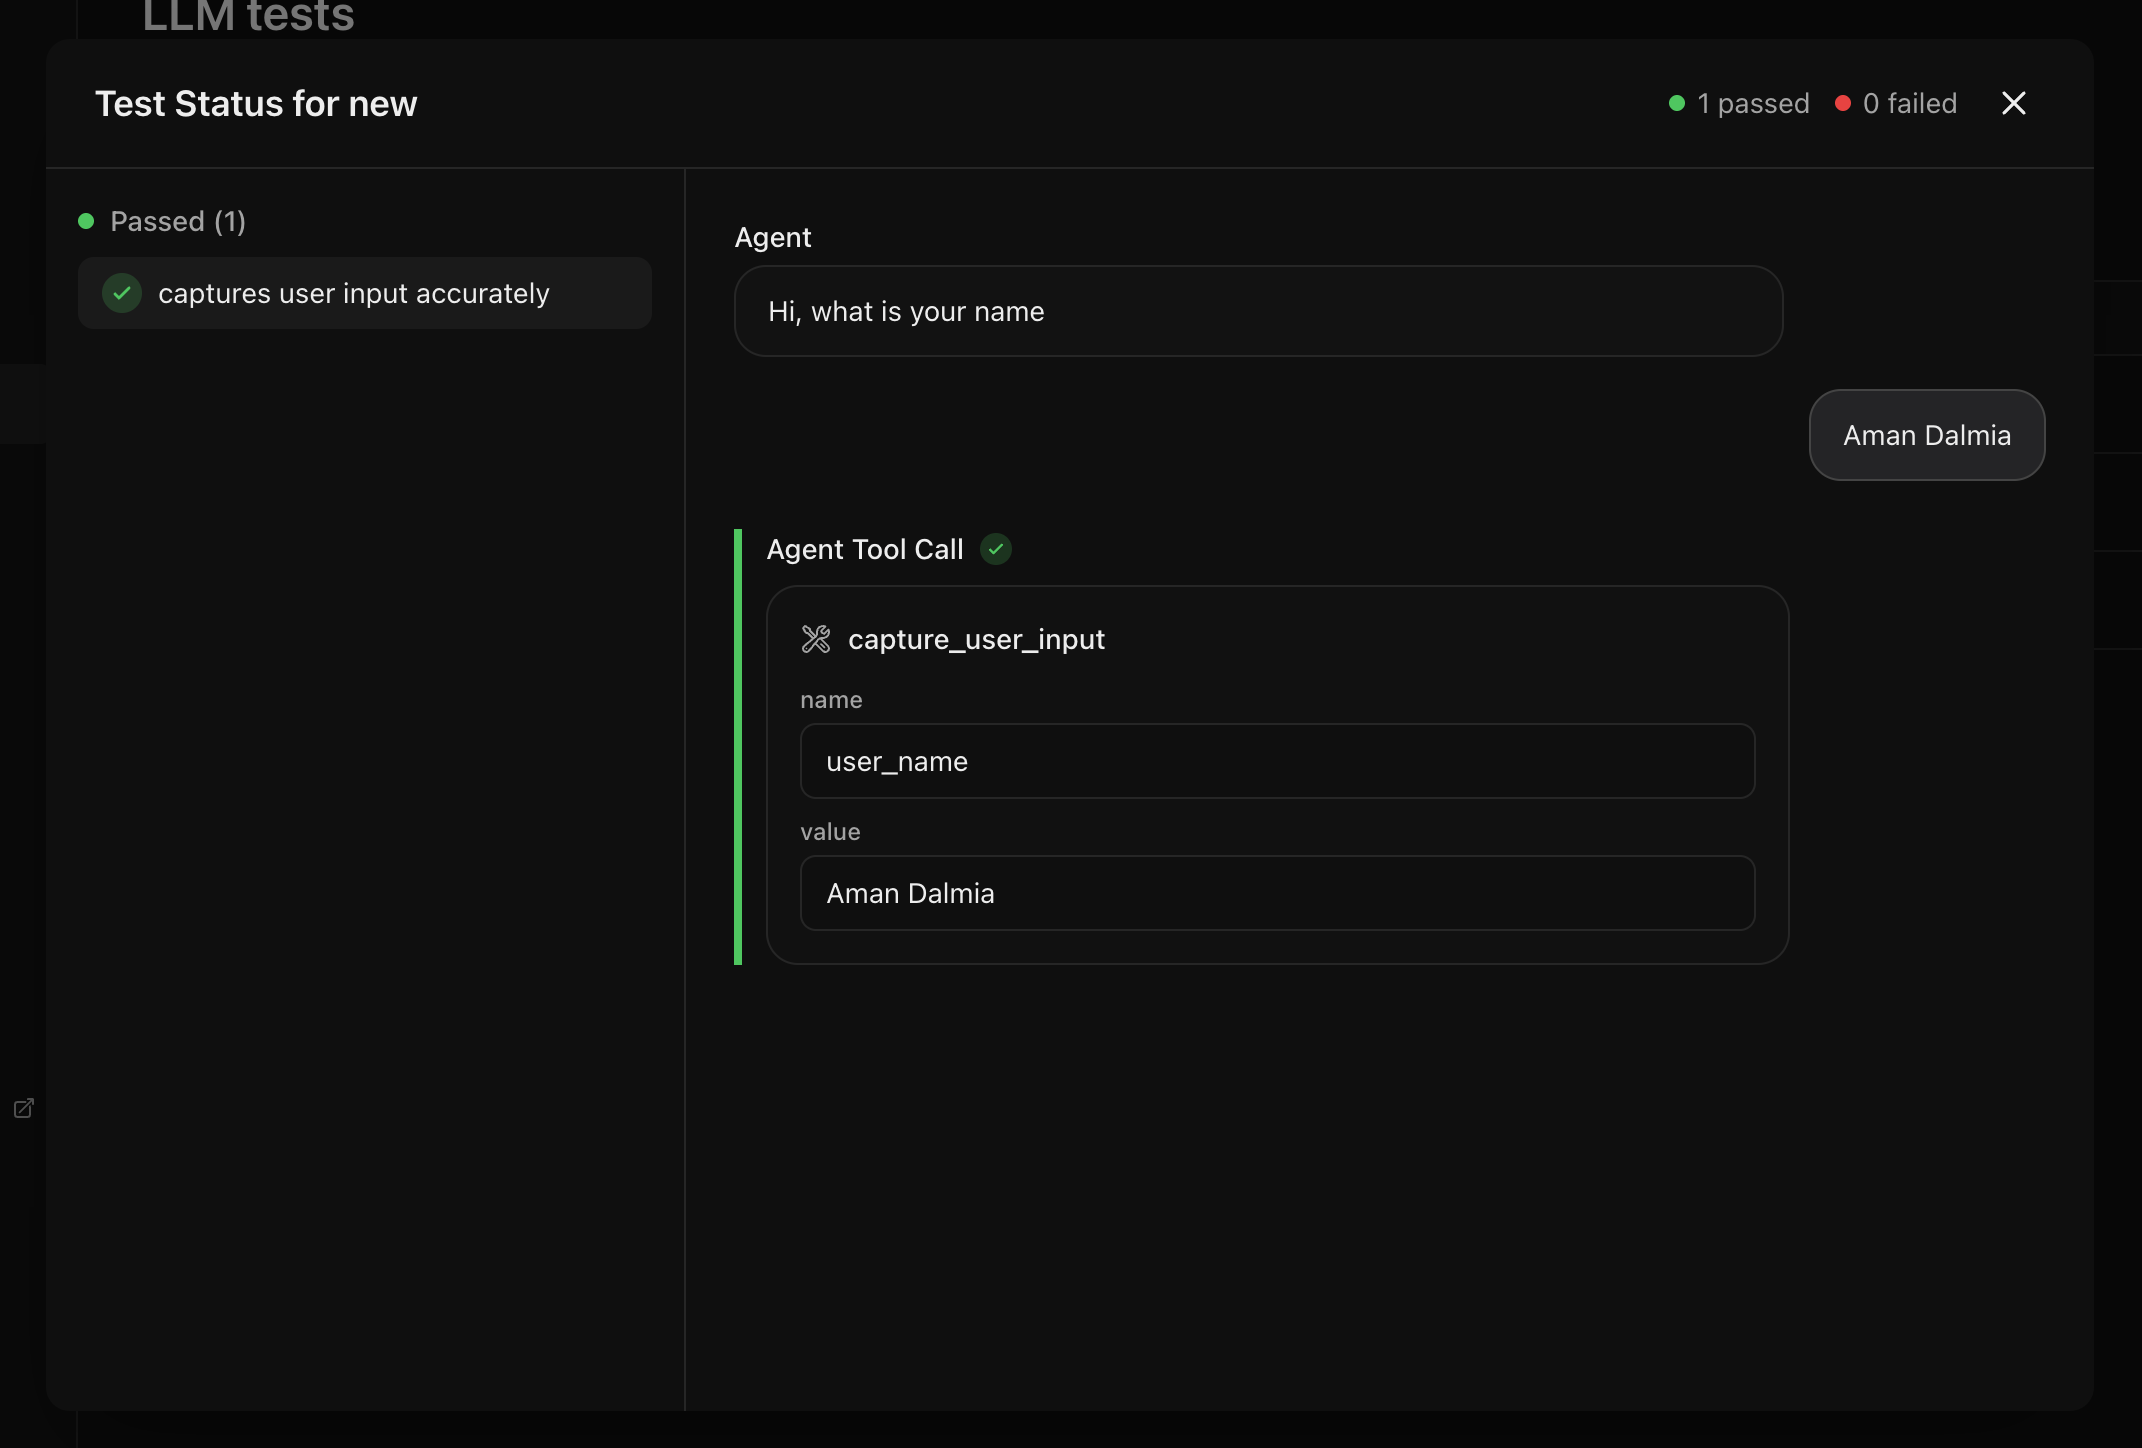
A test runner will open up with the status of the test updating once it
completes. By clicking on a test case, you can view the agent's response and whether it passed the test.
Selecting the **Attach this test to the agent config** checkbox will attach
the test to the list of all tests for the selected agent
A test runner will open up with the status of the test updating once it
completes. By clicking on a test case, you can view the agent's response and whether it passed the test.
 ## Run all tests for one agent
Navigate to the **Tests** tab of the agent you want to test. You can add new tests by selecting the **Add test** button or run the existing tests by clicking the **Run all tests** button.
## Run all tests for one agent
Navigate to the **Tests** tab of the agent you want to test. You can add new tests by selecting the **Add test** button or run the existing tests by clicking the **Run all tests** button.
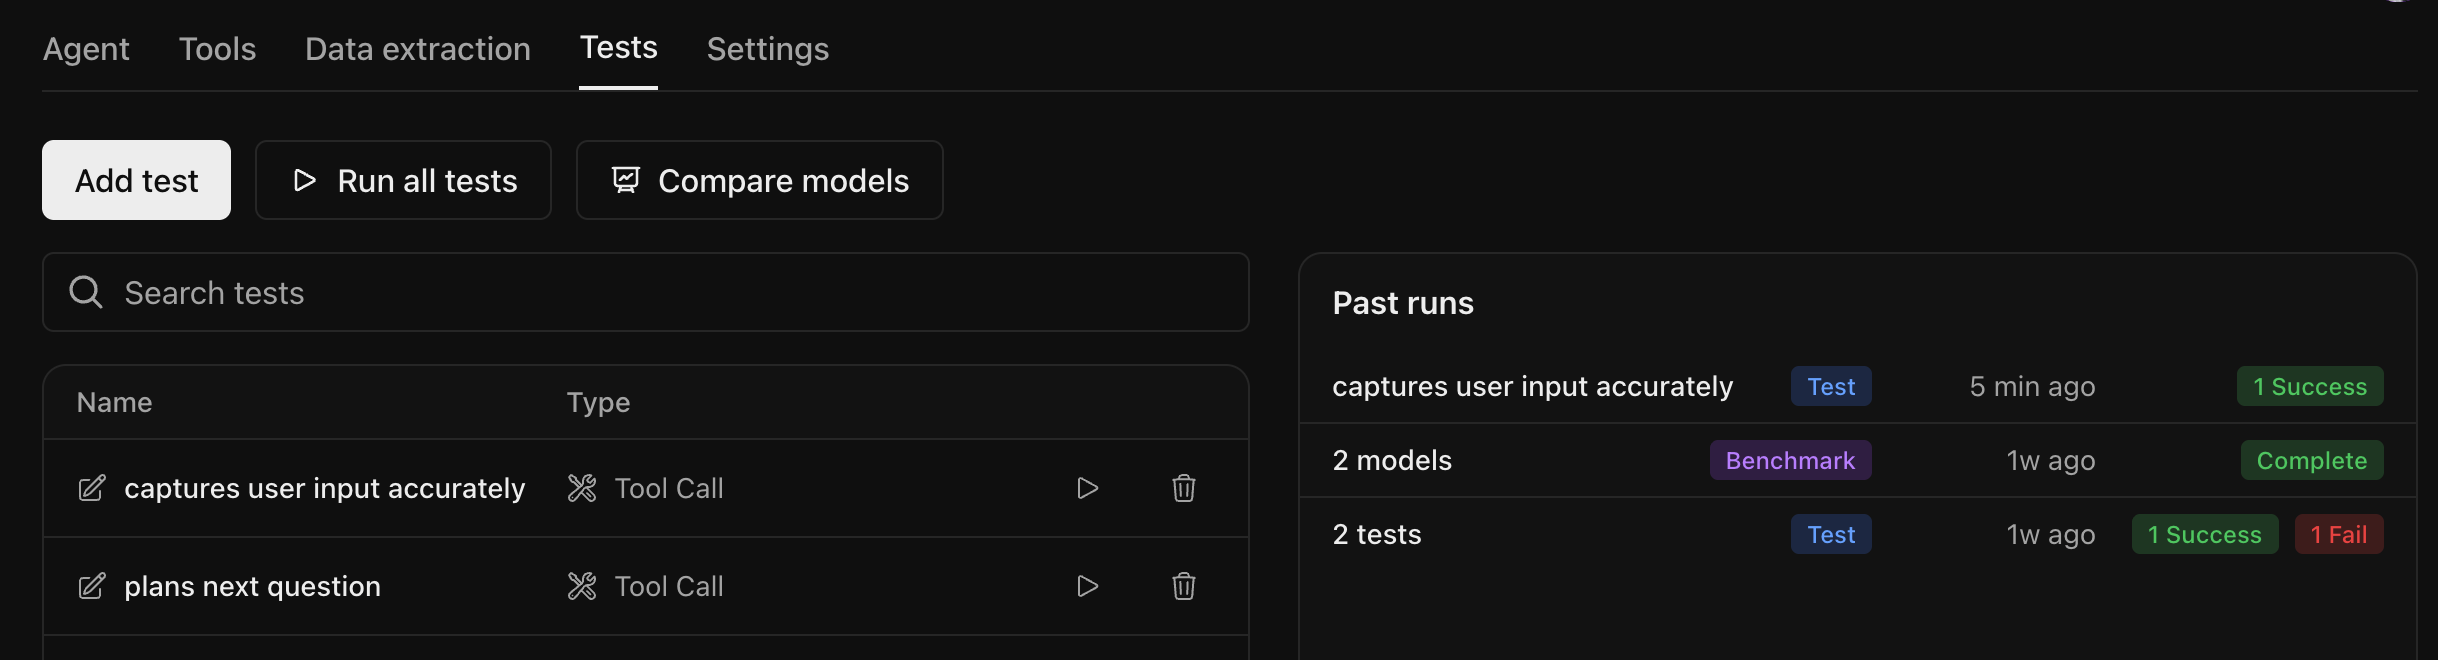 A test runner will open up with the status of each test case updating as it completes. By clicking on a test case, you can view the agent's response and whether it passed the test.
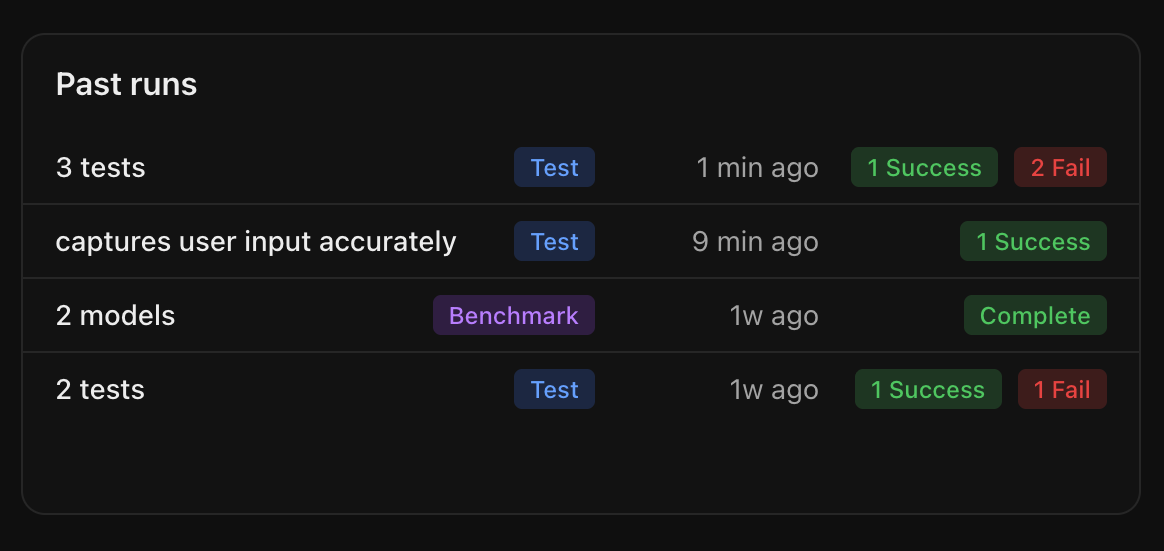
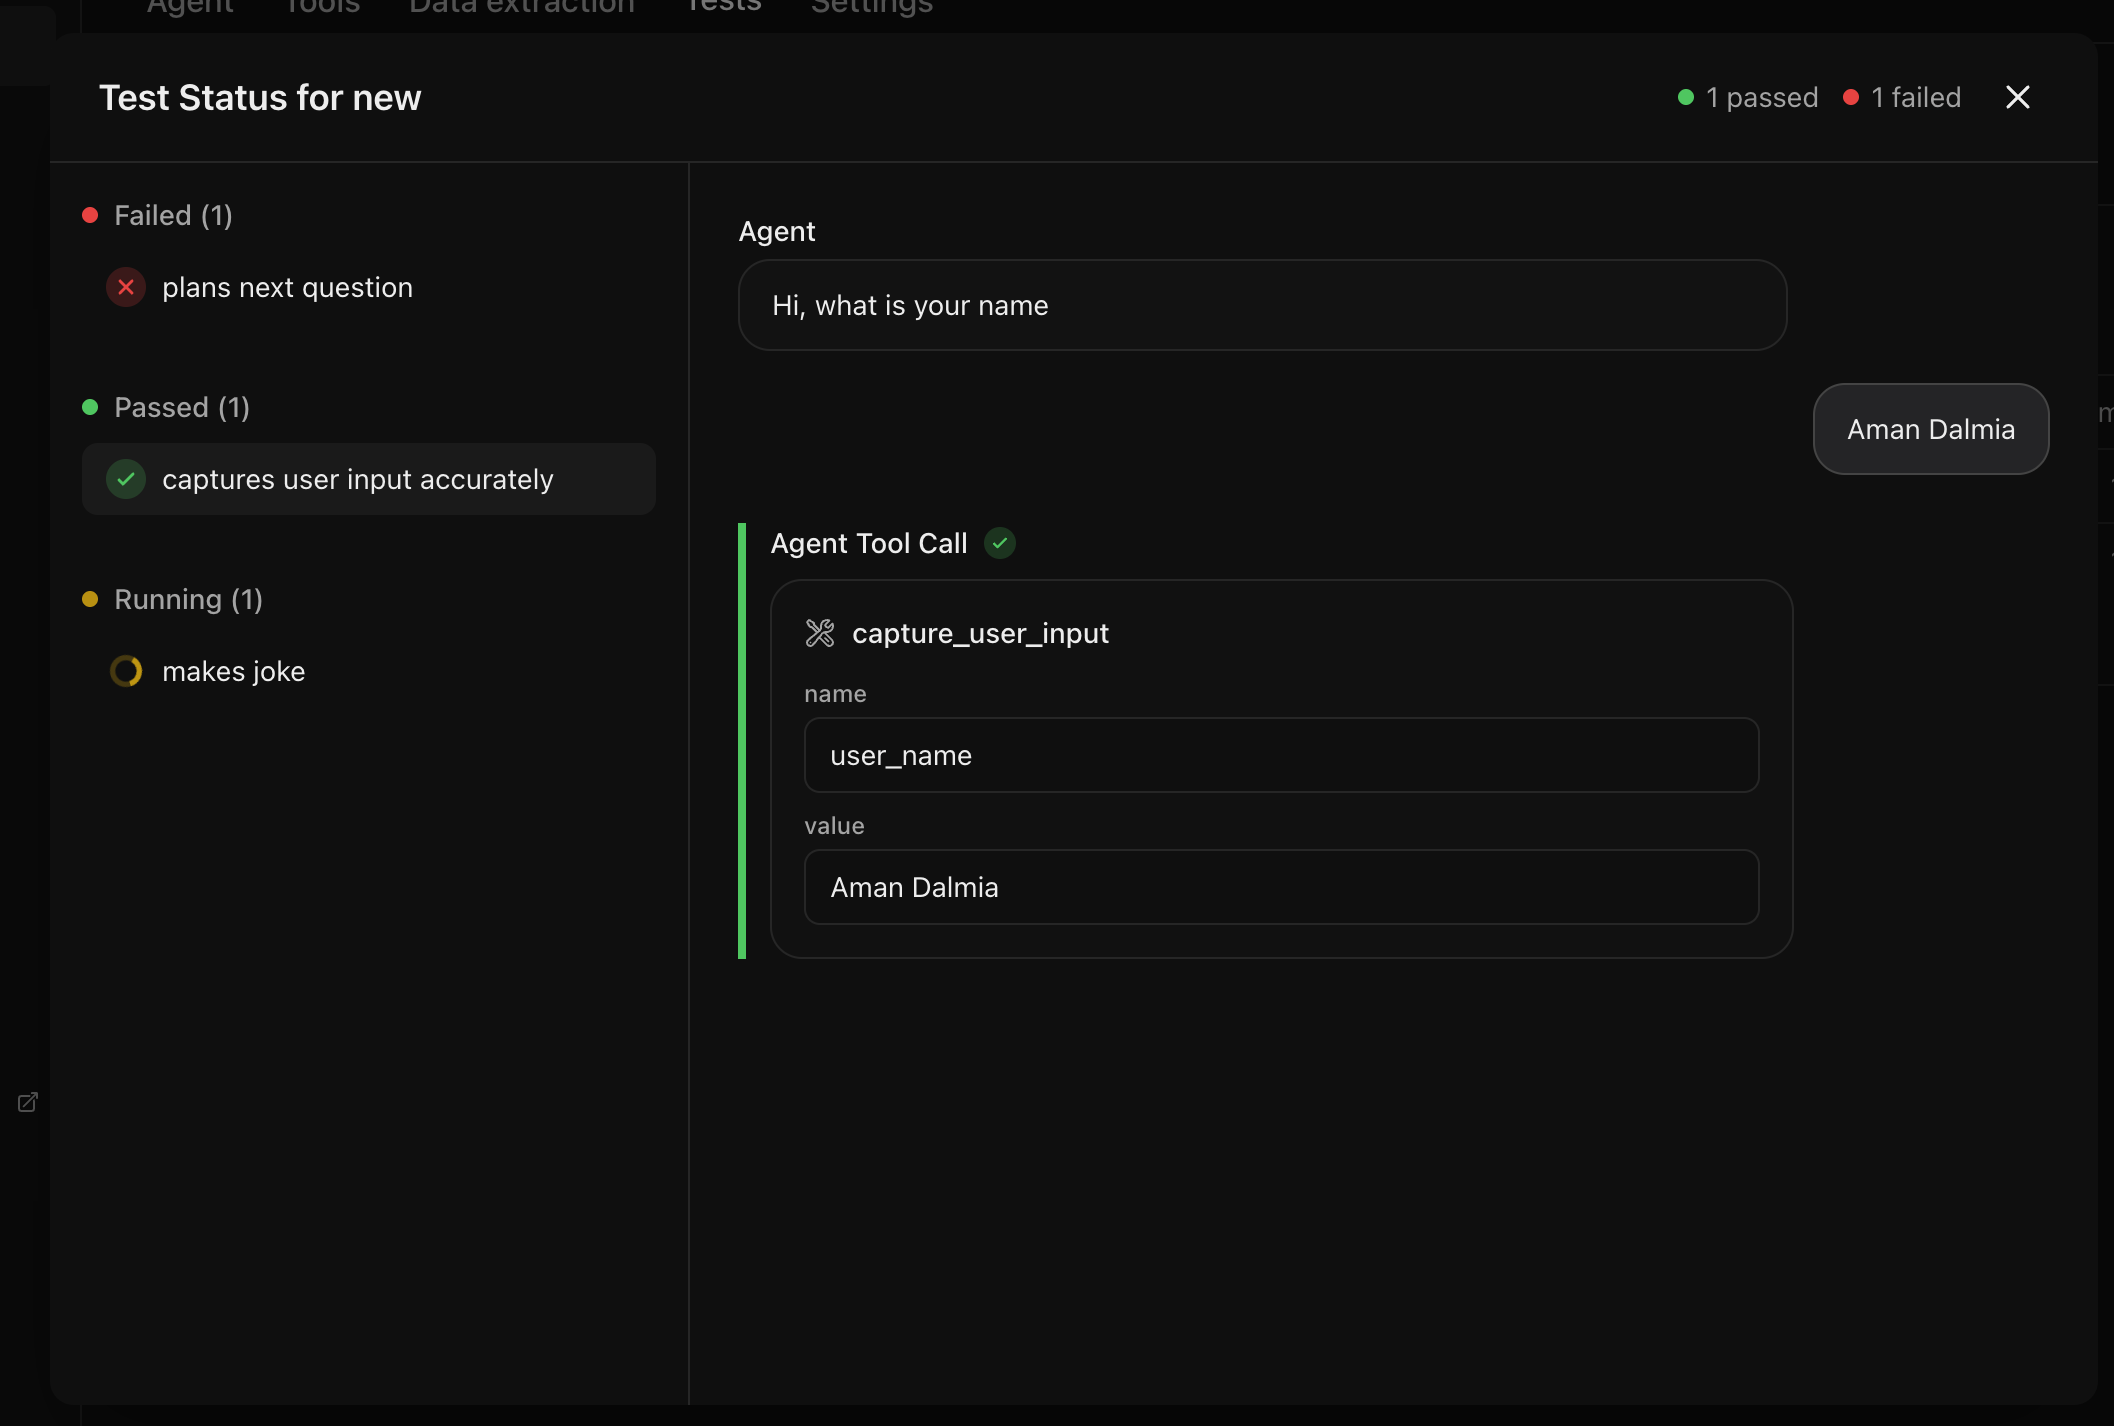 You can view all the past test runs for that agent and their results.
 ## Find the best LLM for your agent
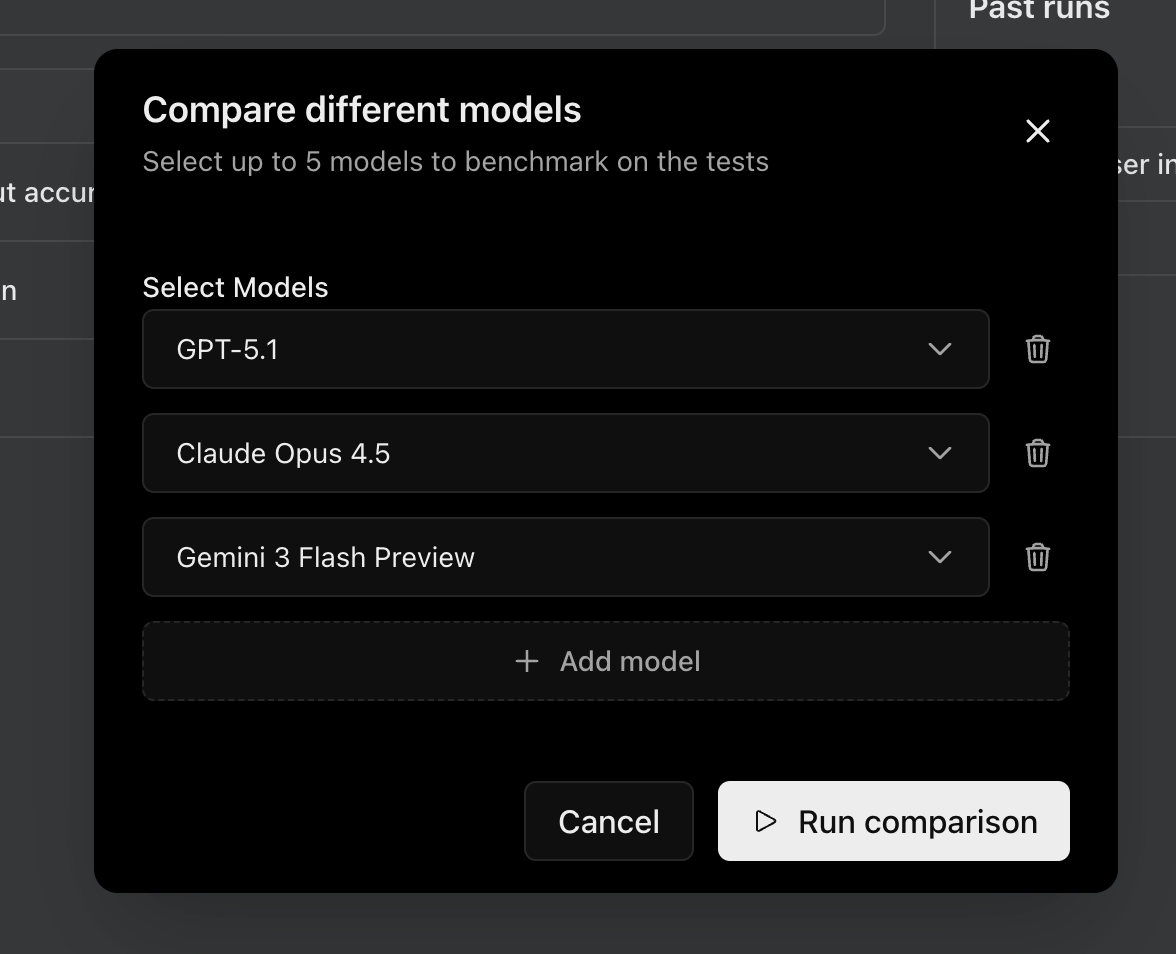
The tests above are run using the LLM configured for that agent. But it may not be the optimal model for your use case. You can compare the performance of different LLMs on your tests by clicking the **Compare models** button.
#### Model selection
You can select upto 5 models that you want to compare and select **Run comparison** to start the evaluation.
## Find the best LLM for your agent
The tests above are run using the LLM configured for that agent. But it may not be the optimal model for your use case. You can compare the performance of different LLMs on your tests by clicking the **Compare models** button.
#### Model selection
You can select upto 5 models that you want to compare and select **Run comparison** to start the evaluation.
 For **agent connections**, only models valid for the provider selected on the agent's connection page are shown:
* If you chose **OpenRouter** as your provider, any model supported on OpenRouter can be selected.
* If you chose **OpenAI**, **Anthropic**, **Google**, or another specific provider, only models from that provider are shown.
To change which models are available, update the model provider on the agent's connection page. See [Enable benchmarking across models](/docs/core-concepts/agent-connections#enable-benchmarking-across-models) for details.
#### Verifying agent connection
For agent connections, Calibrate [verifies](/docs/core-concepts/agent-connections#verify-your-connection) your agent on a sample input with each selected model **before** the benchmark can run. Every model you add to the comparison shows one of these states next to it:
* **not checked** — Just added, never verified with this model
* **verified** — Verified
* **failed** — Verification failed; the error message is shown along with the actual output received from your agent so you can debug
For **agent connections**, only models valid for the provider selected on the agent's connection page are shown:
* If you chose **OpenRouter** as your provider, any model supported on OpenRouter can be selected.
* If you chose **OpenAI**, **Anthropic**, **Google**, or another specific provider, only models from that provider are shown.
To change which models are available, update the model provider on the agent's connection page. See [Enable benchmarking across models](/docs/core-concepts/agent-connections#enable-benchmarking-across-models) for details.
#### Verifying agent connection
For agent connections, Calibrate [verifies](/docs/core-concepts/agent-connections#verify-your-connection) your agent on a sample input with each selected model **before** the benchmark can run. Every model you add to the comparison shows one of these states next to it:
* **not checked** — Just added, never verified with this model
* **verified** — Verified
* **failed** — Verification failed; the error message is shown along with the actual output received from your agent so you can debug
 Clicking **Run comparison** when any selected model is unverified opens the [Verify connection dialog](/docs/core-concepts/agent-connections#verify-your-connection) — customize the sample request and click **Send & Verify** to run the check.
 You cannot proceed to the benchmark run until **every** selected model is verified.
Once a model is verified, the result is saved against your agent's connection
— the next time you select that same model, it shows up as **verified**
immediately, no re-verification needed.
If a model fails verification, click **Retry failed** to re-run just the failed check (for example, after fixing your agent or the model routing on your end).
#### Leaderboard
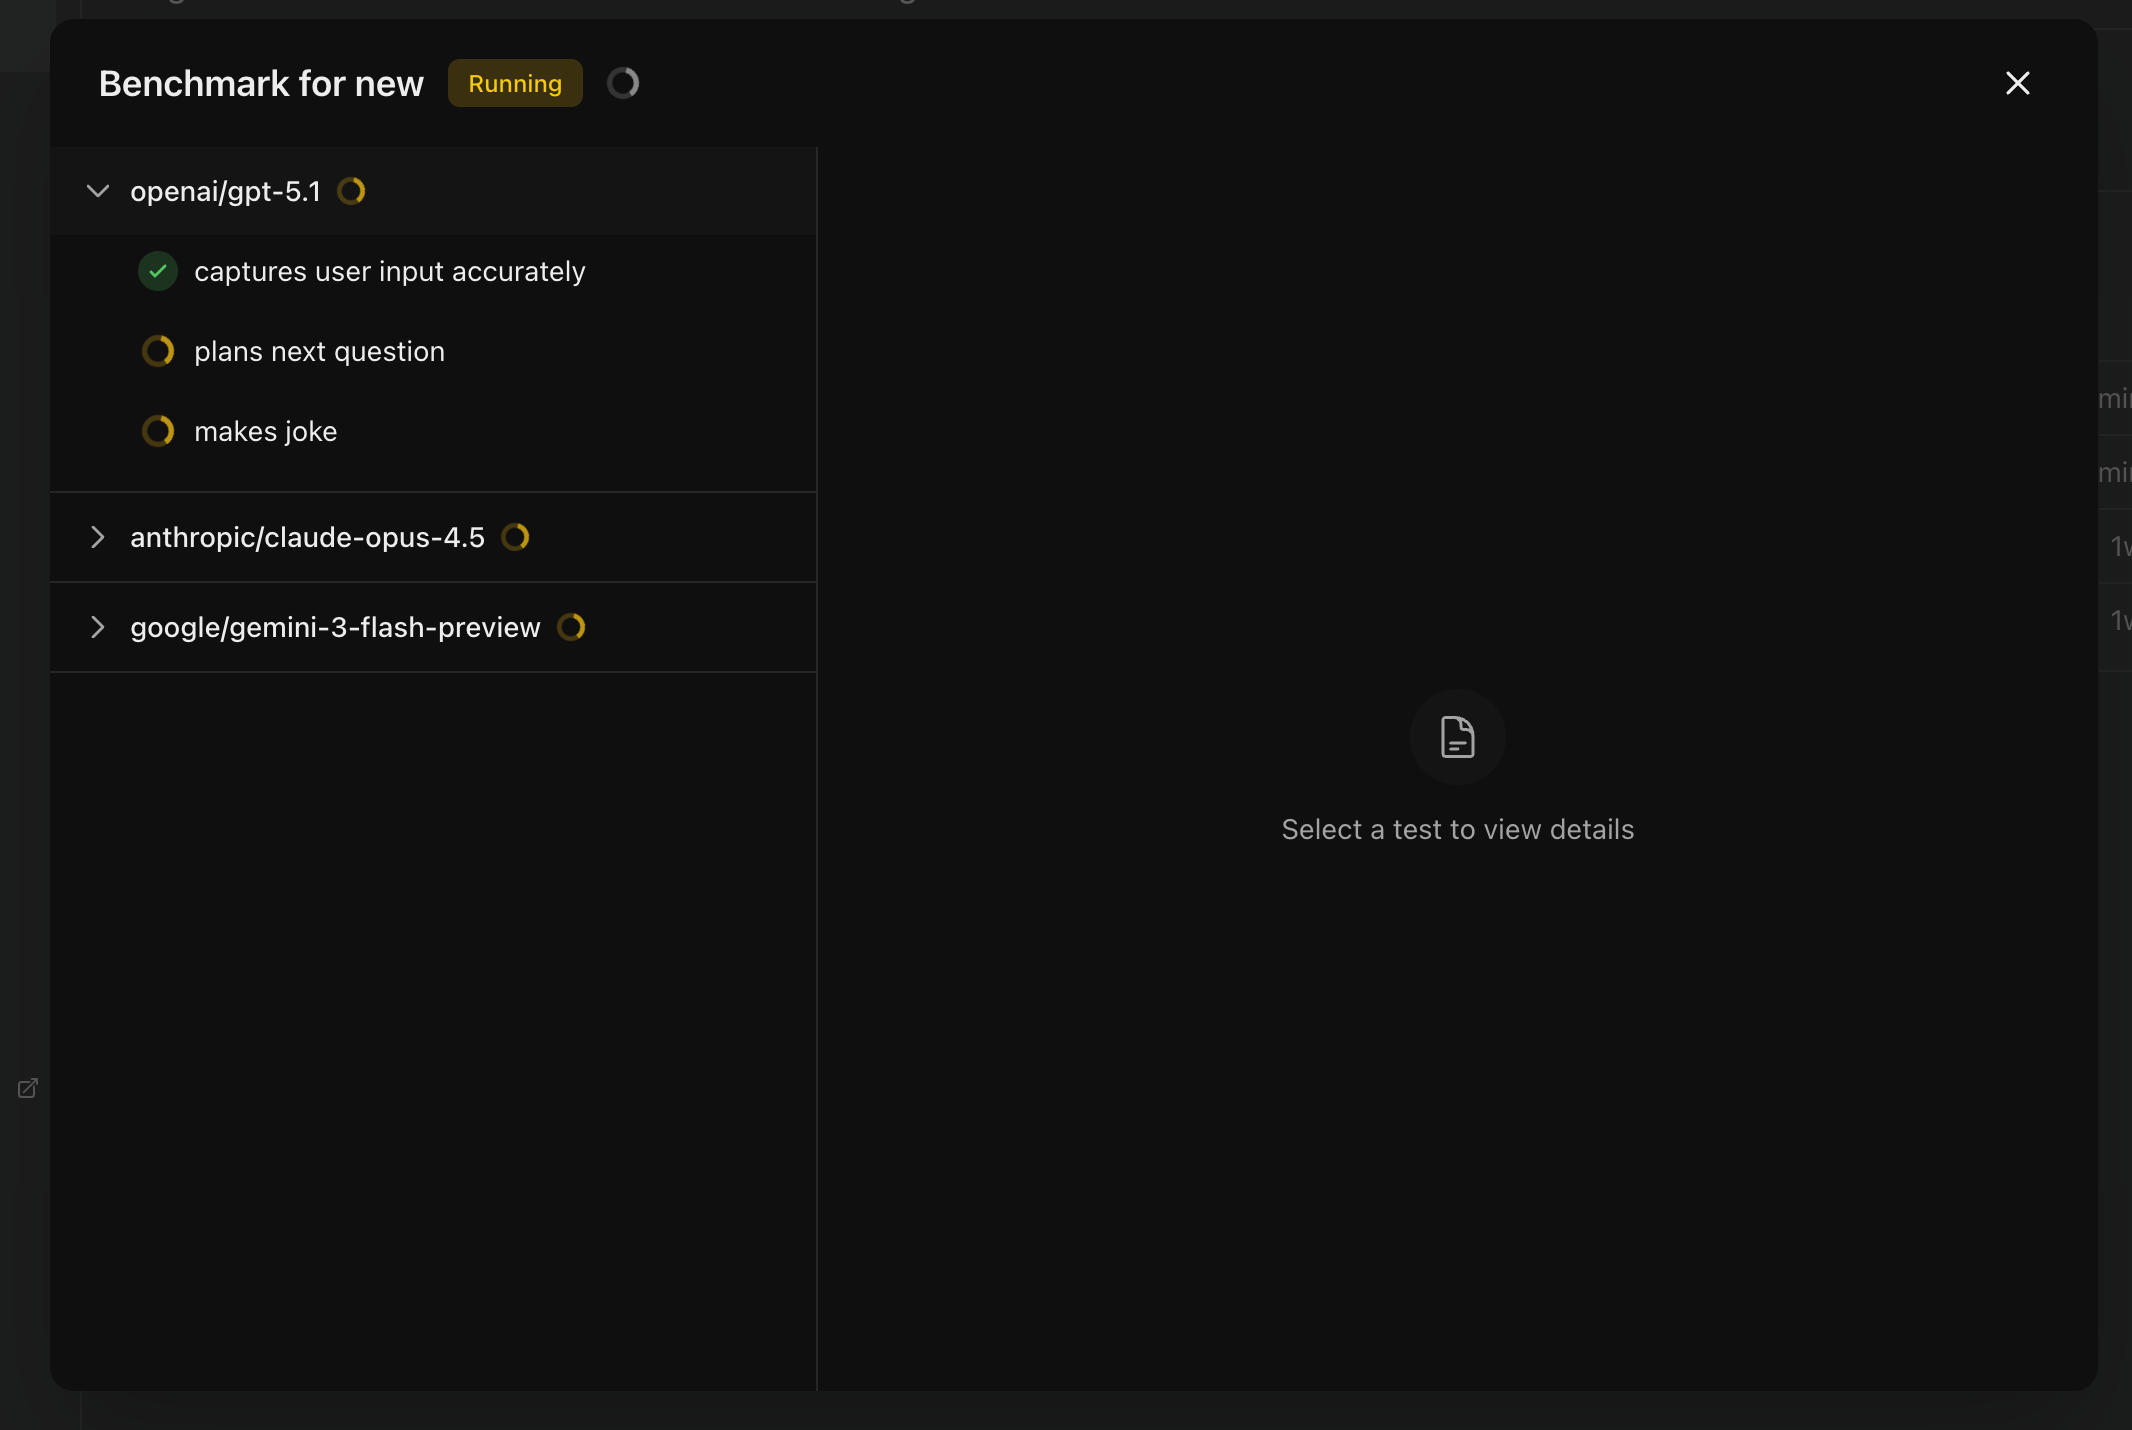
You will see the status of each test for each provider updating as it completes.
You cannot proceed to the benchmark run until **every** selected model is verified.
Once a model is verified, the result is saved against your agent's connection
— the next time you select that same model, it shows up as **verified**
immediately, no re-verification needed.
If a model fails verification, click **Retry failed** to re-run just the failed check (for example, after fixing your agent or the model routing on your end).
#### Leaderboard
You will see the status of each test for each provider updating as it completes.
 Once the tests for all the providers are complete, a leaderboard will be displayed with the results.
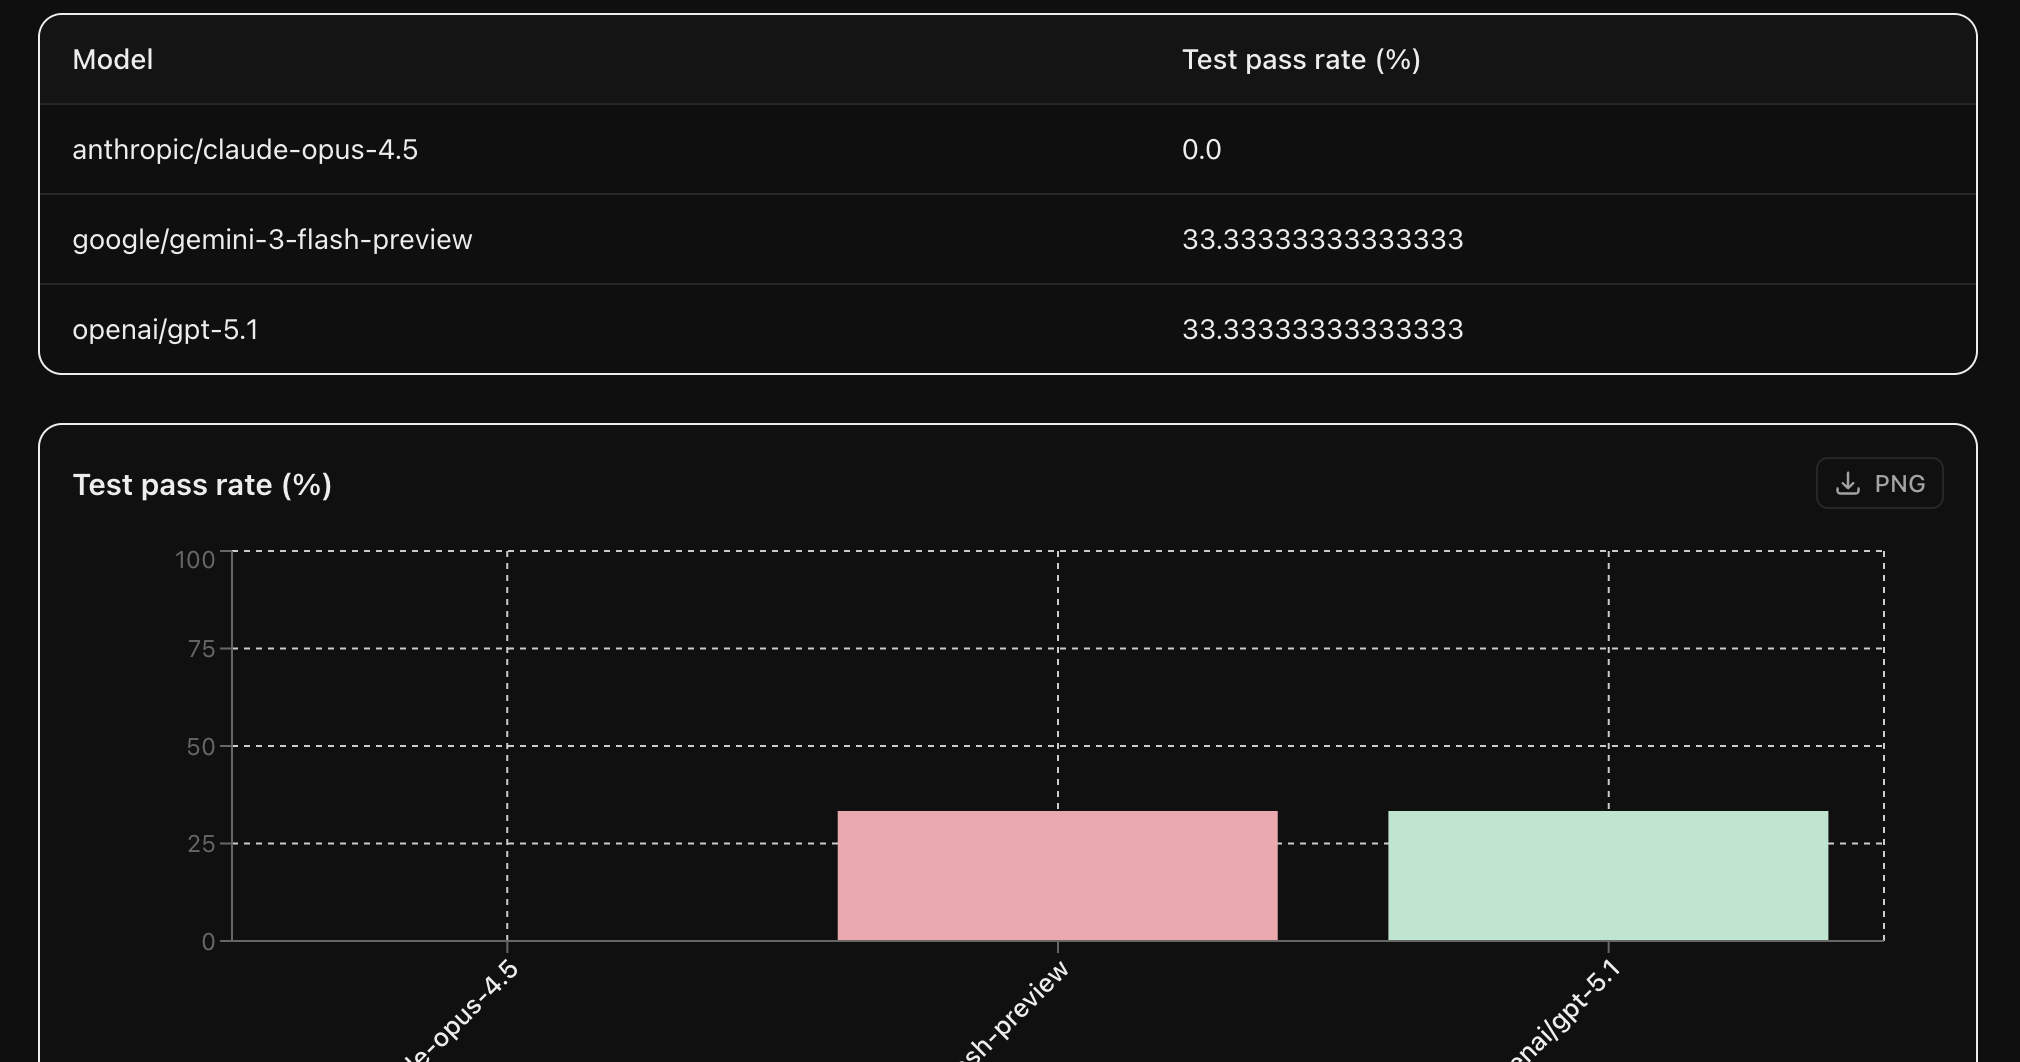 The pass rate for each model indicates the % of tests passed.
## Sharing your results publicly
You can make any completed test run or benchmark publicly accessible.
### Sharing a test run
Open a test run and click the **Share** button to make it public.
The pass rate for each model indicates the % of tests passed.
## Sharing your results publicly
You can make any completed test run or benchmark publicly accessible.
### Sharing a test run
Open a test run and click the **Share** button to make it public.
 It toggles to **Public** with a **Copy link** button.
 Share the link with others to let them view the results without needing a Calibrate account.
 ### Sharing a benchmark
For sharing a benchmark, follow the same steps as sharing a test run.
### Sharing a benchmark
For sharing a benchmark, follow the same steps as sharing a test run.

 ## Bulk upload tests
If you have many test cases, you can upload them all at once via CSV. Click **Bulk upload** on the LLM Evaluation page.
## Bulk upload tests
If you have many test cases, you can upload them all at once via CSV. Click **Bulk upload** on the LLM Evaluation page.

 1. Select the test type: **Next Reply** or **Tool Call**
2. Select the **Language** (English, Hindi, or Kannada)
3. Upload a CSV file or drag and drop it
Click **Download sample CSV** in the dialog to get a template with the correct
format and a README with detailed column descriptions.
Your CSV should have three columns:
| Column | Description |
| ---------------------- | -------------------------------------------------------------------------------------------------------------------------------------------------------------------------------------------------------------------------------------- |
| `name` | A unique test name — must differ from every other test in the CSV and from any previously created test. |
| `conversation_history` | A JSON array of chat messages in OpenAI format. Each message is an object with `role` (`"user"` or `"assistant"`) and `content`. The conversation should end with a user message, since the agent's next reply is what gets evaluated. |
| `criteria` | Plain-text description of what the agent's response should contain or how it should behave to pass. An LLM judge evaluates the agent's actual reply against this criteria. |
Your CSV should have three columns:
| Column | Description |
| ---------------------- | ---------------------------------------------------------------------------------------------------------------------------------------------------------------------------------------------------------------------------------------------- |
| `name` | A unique test name — must differ from every other test in the CSV and from any previously created test. |
| `conversation_history` | A JSON array of chat messages in OpenAI format. Each message is an object with `role` (`"user"` or `"assistant"`) and `content`. Should end with a user message, since the test evaluates which tools the agent calls after this conversation. |
| `tool_calls` | A JSON array of expected tool call objects. Use an empty array (`[]`) to assert that **no** tools should be called. |
Each tool call object supports these fields:
| Field | Type | Description |
| ---------------------- | ----------------------------------- | ------------------------------------------------------------------------------------------------------------------------------------------- |
| `tool` | string (required) | The tool name — must match exactly as configured in your agent. |
| `arguments` | object (optional) | Expected arguments the agent should pass. If omitted or set to `{}`, arguments aren't checked (equivalent to `accept_any_arguments: true`). |
| `accept_any_arguments` | boolean (optional, default `false`) | If `true`, the test passes regardless of what arguments the agent sends — useful when you only care that the tool was called. |
| `is_called` | boolean (optional, default `true`) | Set to `false` to assert this tool should **not** be called. |
4. (Optional) Tick **Assign tests to agents** and pick one or more agents — the uploaded tests are automatically added to each selected agent's test list, so you don't have to attach them manually later.
1. Select the test type: **Next Reply** or **Tool Call**
2. Select the **Language** (English, Hindi, or Kannada)
3. Upload a CSV file or drag and drop it
Click **Download sample CSV** in the dialog to get a template with the correct
format and a README with detailed column descriptions.
Your CSV should have three columns:
| Column | Description |
| ---------------------- | -------------------------------------------------------------------------------------------------------------------------------------------------------------------------------------------------------------------------------------- |
| `name` | A unique test name — must differ from every other test in the CSV and from any previously created test. |
| `conversation_history` | A JSON array of chat messages in OpenAI format. Each message is an object with `role` (`"user"` or `"assistant"`) and `content`. The conversation should end with a user message, since the agent's next reply is what gets evaluated. |
| `criteria` | Plain-text description of what the agent's response should contain or how it should behave to pass. An LLM judge evaluates the agent's actual reply against this criteria. |
Your CSV should have three columns:
| Column | Description |
| ---------------------- | ---------------------------------------------------------------------------------------------------------------------------------------------------------------------------------------------------------------------------------------------- |
| `name` | A unique test name — must differ from every other test in the CSV and from any previously created test. |
| `conversation_history` | A JSON array of chat messages in OpenAI format. Each message is an object with `role` (`"user"` or `"assistant"`) and `content`. Should end with a user message, since the test evaluates which tools the agent calls after this conversation. |
| `tool_calls` | A JSON array of expected tool call objects. Use an empty array (`[]`) to assert that **no** tools should be called. |
Each tool call object supports these fields:
| Field | Type | Description |
| ---------------------- | ----------------------------------- | ------------------------------------------------------------------------------------------------------------------------------------------- |
| `tool` | string (required) | The tool name — must match exactly as configured in your agent. |
| `arguments` | object (optional) | Expected arguments the agent should pass. If omitted or set to `{}`, arguments aren't checked (equivalent to `accept_any_arguments: true`). |
| `accept_any_arguments` | boolean (optional, default `false`) | If `true`, the test passes regardless of what arguments the agent sends — useful when you only care that the tool was called. |
| `is_called` | boolean (optional, default `true`) | Set to `false` to assert this tool should **not** be called. |
4. (Optional) Tick **Assign tests to agents** and pick one or more agents — the uploaded tests are automatically added to each selected agent's test list, so you don't have to attach them manually later.
 Once you confirm, the tests will be uploaded (if they are in the right format) and attached to the selected agents.
## Next steps
Evaluate TTS providers on your dataset
Once you confirm, the tests will be uploaded (if they are in the right format) and attached to the selected agents.
## Next steps
Evaluate TTS providers on your dataset